

How To Fix A Rivet At Home
After a long fourth dimension of traveling across rivers and oceans, aluminum boat rivets may announced in your craft. This is inevitable since your vessel has been exposed to harmful factors, such as seawater and extreme weather.
Hence, many boaters are trying to discover the best way to replace rivets in aluminum boats. Some may search for professional person maintenance services while others adopt the DIY road to save coin and better their skills. That leads united states of america to the question "How to fix leaky rivets in aluminum boats?"
If you are looking for proper instructions on riveting aluminum boats, this article is perfect for yous! In this mail, we will provide a detailed step-by-step tutorial on the aluminum boat rivet repair process.
Likewise, other tips and suggestions on aluminum boat maintenance volition be mentioned then make sure you stay until the stop!
Tabular array of Contents
- What to Prepare When Practicing DIY Aluminum Gunkhole Riveting
- Steps to Fix Leaky Rivets in Aluminum Boats
- Step 1: Re-assess the vessel to search for leftover leaks
- Step 2: Mixing the epoxy mixture
- Stride 3: Put on the epoxy mixture
- Stride 4: Reconnect the rivet gaps
- Step v: Remove the leftover resins
- Elements to Assess When Purchasing a Suitable Epoxy for Replacing Aluminum Boat Rivets
- ane. Water-resistant
- 2. Effectiveness
- three. Flexibility
- Conclusion
What to Prepare When Practicing DIY Aluminum Boat Riveting
The process of fixing Jon boat rivets is similar but there are differences in the equipment and tools utilized:
- Sandpaper
- Toughened Epoxy (we recommend Chiliad/flex 650)
- Application syringes
- Adhesive fillers
- Reusable mixing stick
- Mixing pots
- Protective gloves
- Rut gun or propane torch
We suggest purchasing these items separately. Even so, if yous want, you can also get the whole repair kit.
Steps to Fix Leaky Rivets in Aluminum Boats
Before practicing the procedure, the most important task is identifying all the rivets and damages around the craft. This manner, you can prepare everything only in one case and salve a lot of time and effort.
After that, follow these steps and practice DIY aluminum boat riveting!
Footstep one: Re-assess the vessel to search for leftover leaks
Fifty-fifty if you lot have carefully examined your boat, in that location are still chances that some leaky spots were missed. To prevent this from happening, nosotros propose assessing the entire watercraft in one case again.
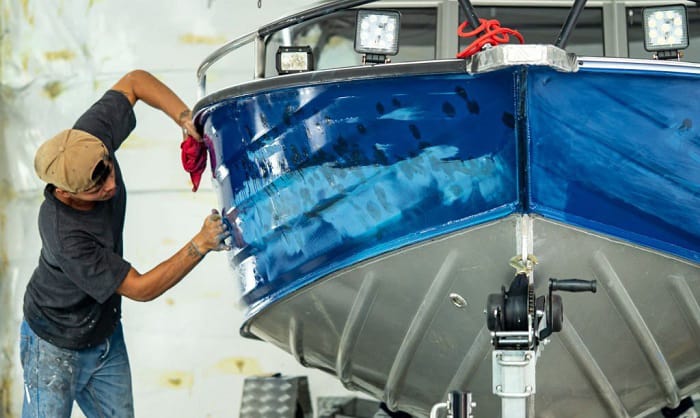
Place the gunkhole on the h2o or if yous want to practice this on country, fill your craft halfway with water. Leaky spots are areas where water comes out. Mark them with indelible markers and wait until your vessel is completely dry.
Remove grime with a stiff brush to reveal the vivid metal surrounding seams and rivets. To make the job easier, use a hand-drill with a brush attachment.
Step 2: Mixing the epoxy mixture
When yous purchase the toughened epoxy, brand sure you buy the one with articulate instructions on how to mix them. Advisedly add together the epoxy into a mixing loving cup and thoroughly whisk it with a mixing stick.
Then, make full the plastic syringe with the epoxy mixture. You could extrude the resin at lower temperatures if you trim the syringe nozzle to a 1/16′′ hole. Before applying the sealant, use a butane torch or rut gun to drain the h2o behind the rivets.
Step 3: Put on the epoxy mixture
Utilize a continuous corporeality of mucilage all around the rivets likewise as along the hot seam with the syringe. Even the slightest fractures volition be filled with epoxy. Melt the metal with a torch to sparse the glue to a water-like texture.
Then, equally you slide it along, brand sure it gets within the seams and behind the rivets. If the heat is kept consistent, the resin will gel then cure chop-chop. Overheating the glue to the point information technology changes its color or smokes is non recommended.
Footstep 4: Reconnect the rivet gaps
Leaky rivets besides demand to be filled upwards during the process. To do this, create an epoxy batch that is as large as the size of the gap. In order to improve the thickness of the epoxy, add up adhesive filler and thoroughly stir information technology.
Utilize a stirring stick when the first glaze of adhesive mixture is still moisture. It pushes the agglutinative filler into the crevices between the seams or behind the leaky rivets. A syringe filled with the heavier epoxy mixture tin be used to force epoxy farther into gaps besides.
Step five: Remove the leftover resins
While the epoxy is still wet, wipe information technology off with a make clean cloth on both faces. If stubborn epoxy must be removed, keep with solvents such as lacquer thinners. Paint should not be dissolved, and epoxy should non be scrubbed out of the seams. If you want to use detergent for cleaning, you lot should choose the right cleaner for your aluminum boat.
For more details, please accept a look at this video:
Elements to Appraise When Purchasing a Suitable Epoxy for Replacing Aluminum Boat Rivets

As you tin encounter in the previous section, the toughened epoxy plays a crucial role in the process of riveting aluminum boats. Therefore, selecting the suitable epoxy for your vessel is essential. In this function, we volition deliver some factors to consider in purchasing affordable yet qualified epoxy:
ane. Water-resistant
Considering you'll be repairing leaks in your watercraft, you should select epoxy resins that are waterproof and designed for usage in damp environments. Commonly, liquid epoxy ought to be applied on a dry surface, although information technology is h2o-resistant one time fully set. Some of the products consolidate and repair themselves while on the h2o, making them ideal for hull restorations.
2. Effectiveness
To have the greatest results, just use the needed blending and conforming item on your leaking rivets. Stay far away from other boats and consider it a seasonal duty to completely clean up the damaged section. After the area has been thoroughly cleaned and scuffed, burn it with a heat gun to remove any wet. To attain the desired effects, utilize the epoxy apace later on combining information technology.
3. Flexibility
Some epoxy versions can exist used in more than places than others. It'southward crucial to think well-nigh what kinds of surfaces they'll work with. Decide whether they'll work for the original purpose or whether they're adjustable. Certain epoxies can be polished, molded, or painted, so be cautious.
Decision
Understanding the process of fixing leaky rivets in aluminum boats is essential to boat owners, specially ones who have metal vessels. Nevertheless, before every task, boaters should call back to prepare enough tools and gadgets to repair the seams quickly and efficiently. This will make your work easier and faster without causing any harm.
Nosotros hope the to a higher place tutorial on how to prepare leaky rivets in aluminum boat will assistance you successfully maintain your aluminum craft's condition. If you need more information about aluminum gunkhole repairing, y'all can bank check this guide to more reference.
Did you enjoy the article? Do you desire to add together anything else? Please let u.s. know and leave a comment below.

Ten years of enjoying countless trips on boats never made me beloved them any less! And so I am here to put all those experiences into good use for other boaters who want to take a condom and fun trip with their friends and families.

How To Fix A Rivet At Home,
Source: https://www.ridetheducksofseattle.com/fix-leaky-rivets-in-aluminum-boat/
Posted by: caleyevout1997.blogspot.com
0 Response to "How To Fix A Rivet At Home"
Post a Comment